
Hey pals!
A few weeks ago I started working part-time at A.C. Moore in South Portland as their Activities Specialist - which basically means I get to make displays and demos for the store, help with birthday parties, classes, etc. It's pretty much a perfect part-time job for me, so I'm glad that the manager mentioned it to me when Adam and I stopped in to get a few things about a month ago. ( I worked there for a few years while I was in college) I'm always wanting to try out new things and this gives me the opportunity to try out some materials and products that I might not have thought of otherwise.
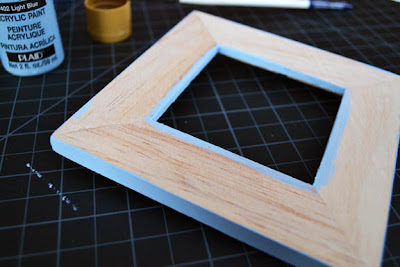
Anyway! On to the real reason for this post! I wanted to share a quick and inexpensive little project that I made at work the other day. It's a really simple way to add some color and customize to a little $1 wooden frame.
I chose to paint my edges with a color that coordinated with the paper, but obviously you don't have to do that!
OK, let's do this.

Materials -


A few weeks ago I started working part-time at A.C. Moore in South Portland as their Activities Specialist - which basically means I get to make displays and demos for the store, help with birthday parties, classes, etc. It's pretty much a perfect part-time job for me, so I'm glad that the manager mentioned it to me when Adam and I stopped in to get a few things about a month ago. ( I worked there for a few years while I was in college) I'm always wanting to try out new things and this gives me the opportunity to try out some materials and products that I might not have thought of otherwise.
Anyway! On to the real reason for this post! I wanted to share a quick and inexpensive little project that I made at work the other day. It's a really simple way to add some color and customize to a little $1 wooden frame.
I chose to paint my edges with a color that coordinated with the paper, but obviously you don't have to do that!
OK, let's do this.
Materials -
- unfinished wood frame (I got mine at AC Moore for $1, it measures 5 x 5)
- 1 sheet of scrapbooking paper or any other kind of paper with an image or pattern
- acrylic paint - I used craft acrylics, they dry a little faster and matte
- glue stick
- x-acto or retractable utility knife
- paintbrush
- cutting mat or something to protect whatever surface you're working on
- pencil

1. With your paper wrong side up, place your frame face down. Trace around the edges with a pen or pencil. Cut out with scissors or knife. It's ok if you cut the paper a little bigger than you traced, but be sure not to make it any smaller! If it's bigger, you can always trim that away later. Set aside.

2. Paint the outer edges of your frame. Craft acrylics dry to the touch pretty quickly, so you're able to do a couple coats in just a few minutes. Don't worry about getting the paint on the front of the frame - it will just be covered later! Let dry for a few minutes and then paint the inner edges. Set aside for a little bit to dry.

3. Using a glue stick put an even layer of glue onto the front of the frame. Make sure not to get any lumps or your might be able to see them under the paper.
4. Lay your cut piece of paper wrong side up and then the frame on top. Flip over and smooth the paper with something clean, ( I used the little Masonite backing that comes with the frame) to assure the paper is adhered to the frame.

5. Once again, flip the frame face down. With your utility knife/x-acto/whatever carefully cut out where the paper covers the opening of the frame. Trim any overlapping edges of paper and that's it! You're done!

Pop in a picture and display! I chose to put an old picture of some kittens in mine, but I guess you could put something else. I hope you enjoyed this simple project and bonus, well, assuming you already own a knife, glue stick and paintbrush, this project only costs about $3!

No comments:
Post a Comment